If you’re visiting this blog post, chances are you’re not just interested in building a lube room but you’ve set off on a journey to transform your entire lubrication program by implementing best practices. While product selection is the most important part of your lubrication program, it will only have so much impact if the entire lubrication life cycle is not taking into consideration when designing your lube room.
Lubrication Life Cycle
- Receiving Product from Your Supplier
- Storage of Lubricants
- Transfer of Oil to Equipment
- Protecting Fluid in Equipment
- Condition Monitoring & Fluid Conditioning
For the purpose of this blog post, we will cover parts 1-3 of the Lubrication Life Cycle followed by another blog post on parts 4-5 in a few weeks.
1. Receiving Product From Your Supplier
After you’ve consolidated all of your lubricants that meet your OEM specifications, it’s time to meet with your lubricant supplier(s) to evaluate their process and procedures for maintaining product integrity before and while the product is being delivered to your site. Oil distributors, or petroleum marketers, handle many different products with varying additive packages some of which are not compatible. Oil analysis on new oil is a great way to test product integrity including ISO 4406 which measures fluid particle cleanliness. If you are under the assumption that new oil is clean enough to meet your OEM’s ISO 4406 fluid cleanliness specs, think again. The best way to address this on the supplier side is to partner with a lubricants supplier that offers a line of pre-filtered lubricants. The best that I’ve seen on the market is the Chevron ISOCLEAN® Certified Lubricants program. In addition to pre-filtering, find out if your lubricants supplier can provide various packaging options such as bulk, gallon jugs, and clean totes.
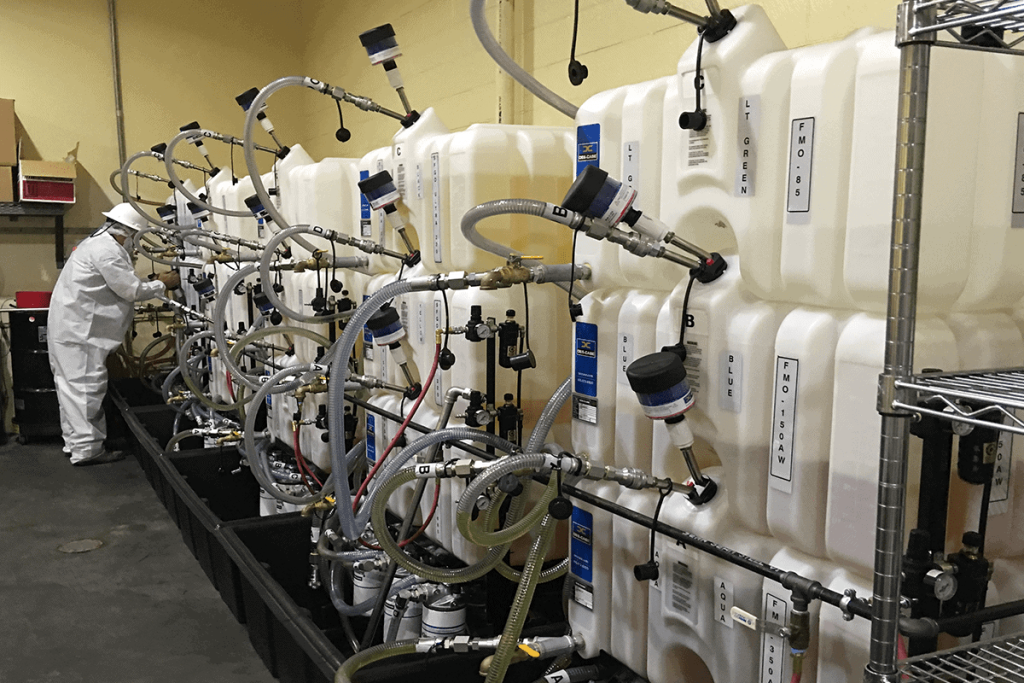
2. Storage of Lubricants
Once you’ve decided which lubricants you’ll be using and how they’ll be delivered whether it be bulk, pails, drums, gallon cases, totes, etc., you’ll need to select equipment to keep your lubricants dry and clean while in storage. A Lubricant Storage System is a best practice for storing lubricants that you intend to regularly use. Lubricant Storage systems include bulk tanks ranging from 30 to 225 gallons as well as dispensing nozzles, transfer hoses, and even filtration equipment.
Three Types of Lubricant Storage Systems
Gravity Flow Spout Style

Pros
- Doesn’t require power
- Least expensive option
- Short lead time
- Can be outfitted with desiccant breathers
Cons
- Does not allow sealed fluid transfer
- No filtration
- Higher viscosity oils pour slowly (especially when cold)
Powered Spout Style

Pros
- Faster flow rates including high viscosity fluids
- Filtration
- Can be outfitted with desiccant breathers
Cons
- Does not allow sealed fluid transfer
- Very expensive
Direct-Connection Dispensing

Pros
- Faster flow rates as high as 5GPM including high viscosity fluids
- Onboard filtration
- Can be outfitted with desiccant breathers
- Allows for sealed fluid transfer with quick-connect fittings
Cons
- More expensive than Gravity Flow Systems
- May look “messy”
Our Recommendations

Descase LT-LMS System
While the “beer tap” style spout style systems are esthetically pleasing, the Direct-Connect Dispensing systems such as the Descase LT-LMS systems simply do a better job of protecting your fluids as they allow for sealed or hermetically safe transfer of fluids.

Descase Drum Adapter Kit
Drum Adapter Kits prohibit the entry of dirt and moisture during the transfer of fluid from drums. They allow for easy equipment adaptation and quick connection to a filtration system or LMS tank.

Descase Standard Series Breathers
Desiccant breathers should be installed on all of your lubricant storage systems. This will control the quality of air entering the tank as it breaths during dispensing of fluid. There are many different types available including breathers with check valves.
3. Transfer of Oil to Equipment
Now that we’ve selected the right place and the right equipment to keep our lubricants clean and dry, you’ll need to protect the lubricant from moisture and dirt as you transfer it to and from the field. Before we get started, let’s take into consideration the actual workload of a lubrication technician. While on a normal day, a tech would make his or her rounds topping off gearboxes, pumps, etc., grease a few motors, and take some oil samples, normal days don’t really exist in the real world. By the time a tech gets started with his or her route, there’s a great chance they’ll be called on the radio to perform an oil change on a pump that went down earlier that day. I’ve seen it 100 times where oil fill containers are left in the field because someone got pulled in another direction to respond to a critical need. For this reason, it’s very important to ensure that not only are you keeping your lubricants clean and dry while in storage but you’re transferring them in hermetically sealed containers while in the field.

A good oil transfer container will have the following features:
- Color Coding System (To prevent cross contamination of fluids)
- Direct-Connect Fill=Point Fittings such as an ISO B Quick Connect
- Desiccant Breather Port
Work with IFM to build your lube room
3D Rendering of Lube Room
https://ifmservices.com/wp-content/uploads/2020/08/Lube-room-for-website.mp4

Download Whitepaper